Internet Connectivity for Your Campervan
While an internet connection isn’t required outside of the initial setup of the smart van system, there are quite a few advantages including:
- Remote access to your Home Assistant setup
- Easily make updates to your Home Assistant setup
- More reliable internet in places with spotty or no cell service
- Option of adding a voice assistant in the future
Ideal Setup (Starlink + Cellular)
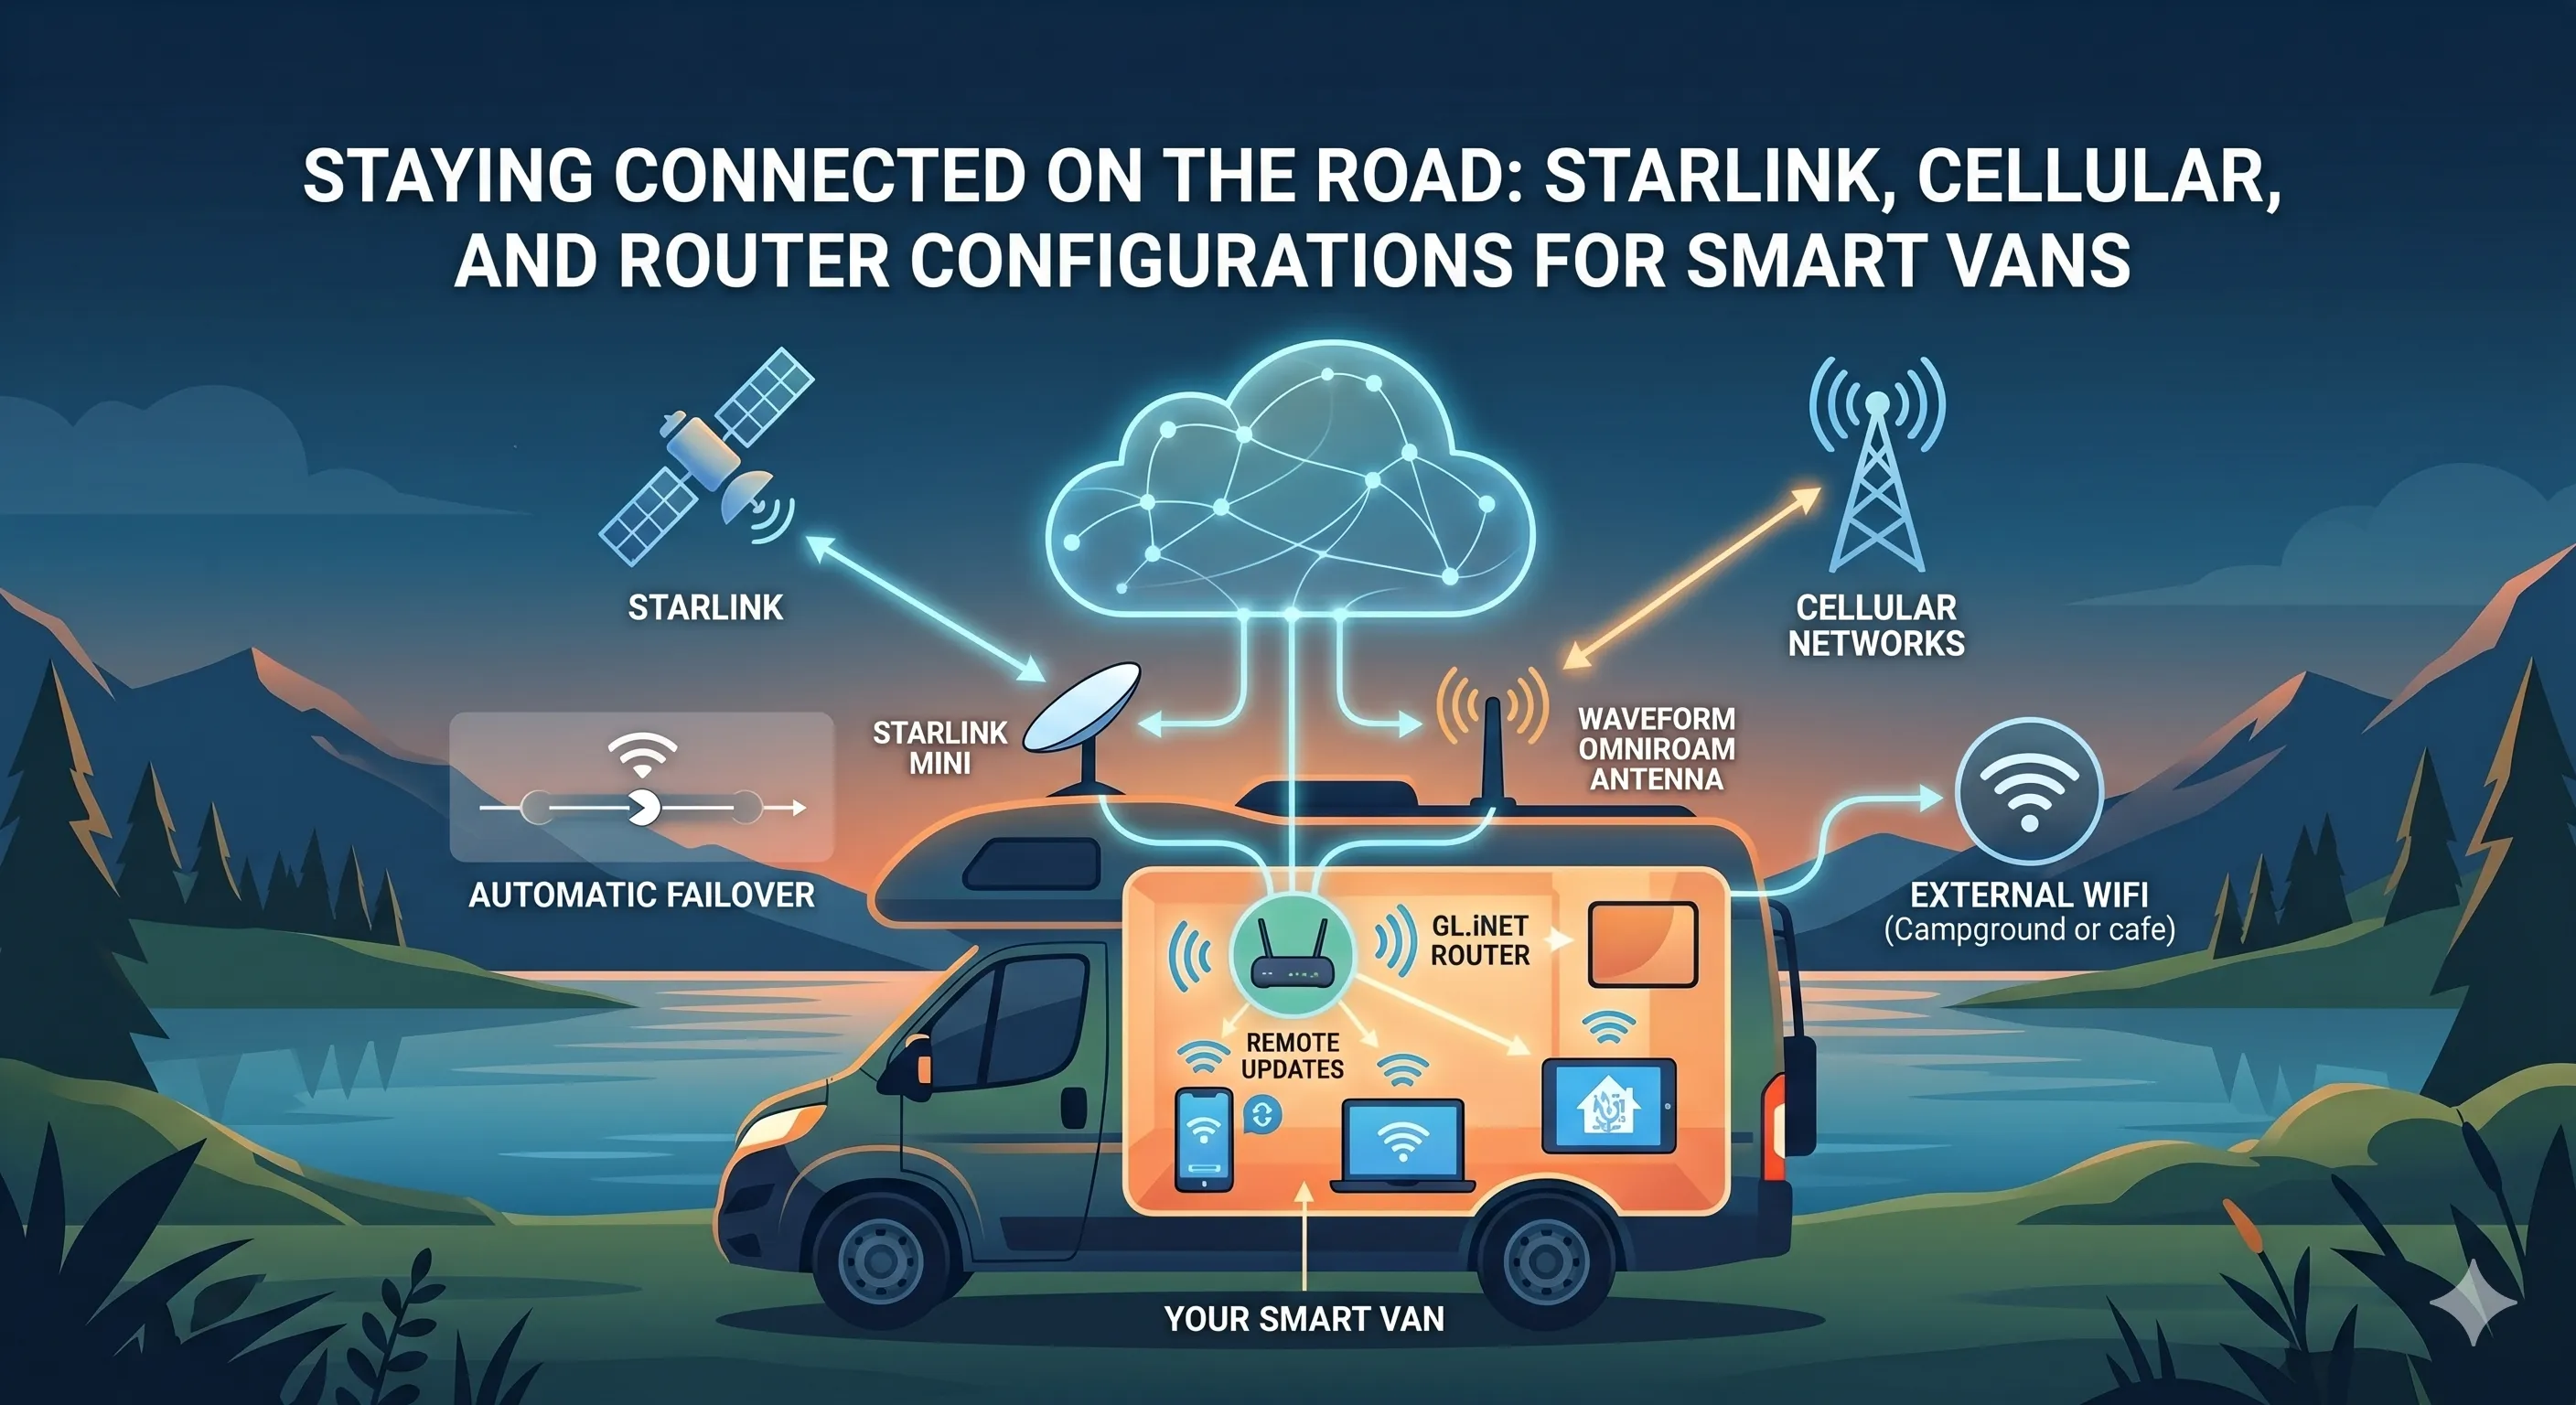
Section titled “Ideal Setup (Starlink + Cellular)”The ideal setup for a campervan would include the following components:
- Starlink Mini with a Roam plan
- GL.iNet GL-X3000 (Spitz AX) Cellular Gateway
- Waveform OmniRoam 6-in-1 Low-Profile Mobile Antenna
This gives you three options for internet access, so you should always stay connected:
- Starlink satellite connection
- Cellular connection (requires a SIM card)
- Connect to a nearby WiFi network
The OmniRoam antenna gets installed on the roof of your van and boosts the range of the GL.iNet router for both WiFi and cellular connections. It is an omnidirectional antenna which is very important for a moving van since you don’t know which direction the cell towers will be. The OmniRoam is the highest recommended antenna I’ve found, but there are plenty of other cheaper options available. You can also get a 4-in-1 antenna instead of the 6-in-1 if you don’t expect to be connecting to external WiFi networks very often. Just make sure the antenna is rated for 4G/5G/WiFi, and has the correct SMA connectors.
The Starlink Mini is the most power hungry component, so you can leave it off and only use it when a cellular or WiFi connection isn’t available. If you have plenty of power in your van, you can just leave the Starlink on all the time and the GL.iNet will automatically switch between the connections depending on what is available at the time.
GL.iNet also makes the Puli AX which is essentially the same as the Spitz AX, plus an integrated battery. It could be worth upgrading to this option in case it’s very important to stay connected even if your van power goes down.
Alternatively, they also make the GL-X2000 Spitz Plus which is the 4G version with 2 WiFi antennas and 2 4G cellular antennas. Or even less expensive, the GL-X750V2 Spitz which is the 4G version with just 2 4G cellular antennas if you don’t expect to be connecting to WiFi.
Starlink Only Setup
Section titled “Starlink Only Setup”The second option is the Starlink only option which requires:
Note that the Starlink Mini has a built in router, but there are times you may want to power off the Starlink Mini to save power. The Starlink Mini may also be installed on the roof of your van which would cause the WiFi signal to be weak inside the van. Because of this, it is recommended to use the Starlink Mini in Bypass Mode with a separate router as your main router.
With this setup, you still have these different options for connectivity:
- Starlink satellite connection
- Cellular connection by using your phone’s hotspot or USB tethering
- Connect to a nearby WiFi network
Note that while this setup has the same connection options as the ideal setup, the cellular connection relies on your phone and must be manually activated, so there is no automatic failover. There is also no external antenna for cellular or WiFi, so the signal would be significantly worse.
The Starlink is also the primary internet source which draws more power than a mobile hotspot, so if left on all the time, would be a more power hungry setup. Starlink also has the limitation of needing a clear view of the sky, so if you spend a lot of time in tree covered areas like the Pacific Northwest, it may not be an ideal option.
Hotspot Only Setup
Section titled “Hotspot Only Setup”The hotspot only setup is the same as the ideal setup without the Starlink.
Bare Bones Setup
Section titled “Bare Bones Setup”The most bare bones setup would be just using a travel router like the Beryl AX mentioned above, or even the cheaper GL.iNet GL-SFT1200 Opal router.
The primary form of internet would be either connecting to a nearby WiFi network using the router’s WiFi-as-WAN feature, or to your phone’s WiFi hotspot. In this setup, Home Assistant would not be connected to the internet most of the time, but could be connected as needed to perform updates or make any changes to the system. There would also be no remote access.
Other Hotspot Options
Section titled “Other Hotspot Options”The above recommendations all use the GL.iNet Cellular Gateways for the hotspot which have the advantage of being high quality routers in addition to the hotspot. If you however already have a hotspot device or prefer to purchase a different one for other reasons, this should still work OK. I would still recommend buying an external antenna for your hotspot device if it supports one to provide a better signal. Many hotspot devices also don’t have other features like WiFi-as-WAN or VPN, so I would also still recommend buying one of the GL.iNet travel routers to use as your primary router, and just use the hotspot for the cellular connection.
My Setup
Section titled “My Setup”I personally have the Netgear Nighthawk M6 Pro installed in my van with an external antenna, the Beryl AX as my main router, and an older Starlink that I only activate and use when I’m going out of cell service for a longer period. These are devices that I already had on hand. If I was starting over new at this point, I would be going with the ideal setup that I listed above.